Showing posts with label Crafts. Show all posts

Thursday, February 12, 2015

Do the Dishes!

Even though it is just George and I living in our house, I am always so amazed at the amount of dishes that pile up! I created a quick little sign from a leftover chalkboard that we used in our wedding so that we could keep track of whose turn it was.  (ignore the water drop stains!)


I also added little Instax Mini pictures to the signs just to give it a little bit more of an ooomph and a punch!  Love my Instax Mini! If you don't have one you should buy one, but after you finish reading this post...


George's side towards me seems a little aggressive, but I created it so I must've been feeling guilty about my lack of doing dishes the day I made this!

Just a quick little craft! Have a wonderful 3 day weekend!


Thursday, August 7, 2014

Beginning of School Year Gift

Pinterest has the cutest ideas EVER for beginning of the school year gifts. Does anyone remember what they did before Pinterest?  I don't even try to think creatively anymore; I just automatically go on Pinterest now before I even activate my brain.

I wanted to make my new teachers a little gift to wish them good luck on their first day with their students!   I used this pin from Pinterest as my inspiration.


All you need to make this is the free printable (available at the bottom of the post), small snack sized ziplock baggies, a paper cutter or scissors, a stapler, and M&Ms. 

I used MEGA M&Ms which I had never seen before and those were a big hit because they are so huge! I have pretzel M&Ms pictured below however because I ran out and had to use my back up stash for the example. #bloggerproblems


Just cut out your printable after you add text to add your message on the back. Don't forget to rotate it  so that the message is readable and the right side up when you fold it!


Fold your message in half so that you have a tent and fill your baggie up with the candies. Slip the tented message over the top of the ziplock baggie, staple it in place, and then you are good to go. Super simple!


It took me about an hour to make over 20 of these baggies from start to finish (including designing the note!) so once you get your system down it goes pretty quickly!


I am having a few technical difficulties with this printable. I know you need to open it in Power Point so you can edit your own message on the other side of the note (see my example above).  If I give you a link to a PDF, you can add text to it, but not rotate it which is required when you do a ziplock bag topper like this.  Hopefully the font carries over when you open this Power Point template, but if it doesn't let me know via email or comment OR download the fun FREE font called Pacifico. :)
Click the picture below to download the potential tricky freebie.


I hope you are able to use this in your classroom and that the freebie actually works, haha!  Have a wonderful first day of school if you haven't started already and if you have I hope you had the best first day possible. :)


Monday, August 4, 2014

Monday Made It - Parking Lot Board

I'm baaaackkk! 

Wow you guys, this summer went by like a blur. Where did all of that time go that I was going to be super productive and create these creative crafts to post on this good ole blog?  


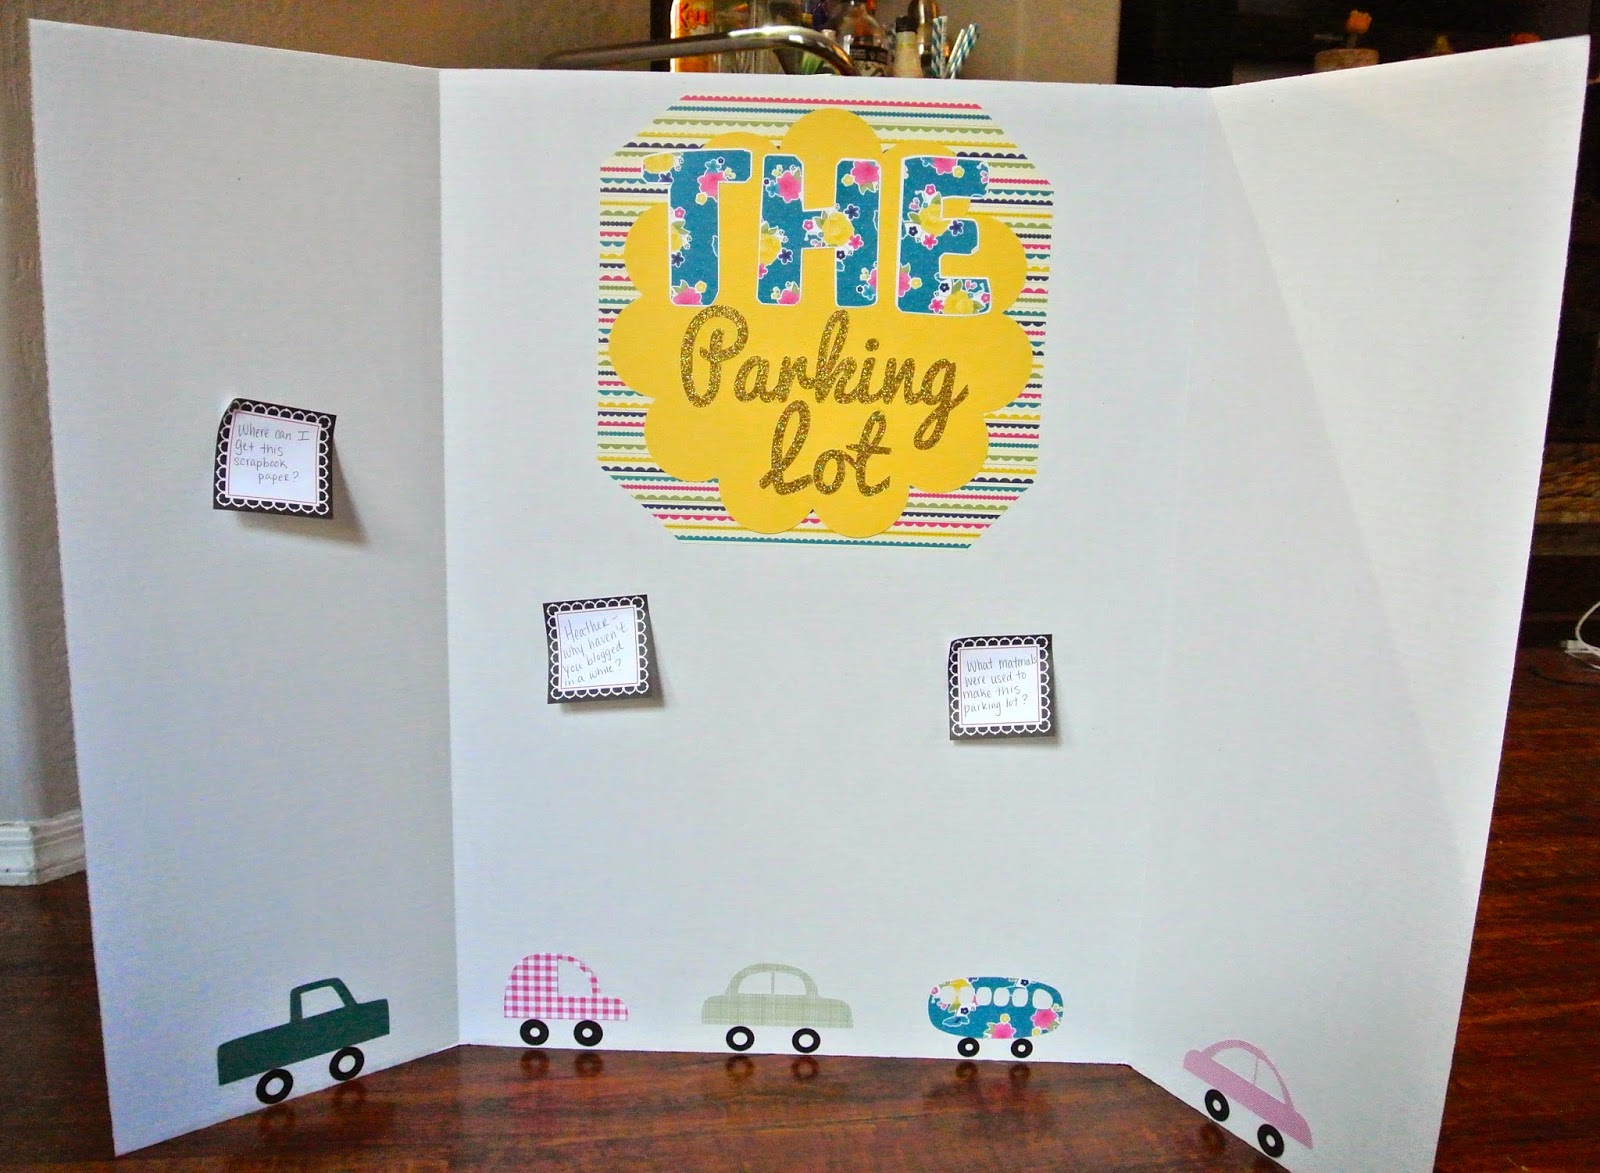
For Monday Made It, I made a Parking Lot board over the weekend for a training I am presenting today. This could be used in your classroom too as a formative assessment, a ticket out the door, or just for good old fashioned questions.  Do any of you use parking lots in your classroom?  I would love to hear your procedure for it if you do!


Let's address the questions on the board, shall we? Haha! 


Good question! 

  • Tri-fold board (Tarjay aka Target)
  • Scrapbook paper
  • Rubber Cement
  • Silhouette Cameo (car shape cutouts are from here)


  • I purchased this scrapbook paper from Stampin' Up. I don't see the designer series paper package that I used for this board but here is one that looks really cute and is similar.


    Well, there are a couple of reasons. I was on vacation for three weeks visiting my sister and her family as well as a road trip up to Nova Scotia, Canada! It was beautiful and I can't wait to post pictures on here soon as a memory for me and to show you all. 

    Another reason is that I started my new job as Instructional Coach last week and it has kept me really busy! I am still adjusting on being out of the classroom and hope that this blog will still be alive and kicking. 

    In the meantime, I hope you all can use the parking lot board idea in your classroom! 


    Be sure to link up to Tara's Monday Made It to post your creations!


    Saturday, May 31, 2014

    A Gift As Good As Gold

    My friend who I have taught with a few years ago got a placement as an Assistant Principal at a different school. We are so proud of her because there were over 100 applicants and ONE spot open. We definitely needed to do something to celebrate and that's where this golden idea came in. I can't take full credit for this gift idea because my friend Cindy also helped dream up this little beauty.  Get it, get it?? Because we are the old friends, we are the gold... Haha, it might be cheesy but we love it!

    We bought the box at Target on clearance and then I just cut out some letters using my Silhouette Cameo cutting machine and modge-podged them on there.


    The pictures really don't do it justice.

    On the inside it is like a gold bonanza! We saw these adorable gold office supplies by Nate Berkus at Target. It was perfect! Can you just imagine the disciplinary matrixes she can staple together with that fabulous golden stapler? It really is a sight to behold.


    All wrapped up with a pretty sparkly bow and ready for gifting.


    So cute - I kind of want to keep it for myself but that might be rude.... right?  ;)


    Wednesday, May 28, 2014

    "Hello" Yarn Bubble

    I have a TON of mustard yellow yarn leftover from the wedding. I could probably knit you and everyone else in your family a sweater with how much yarn I have secretly stowed away.  Because of that, many of my crafts are *shocker* made from yellow yarn!


    I saw this pin on Pinterest not too long ago and knew that I had to replicate it. It's got the perfect combination of color and quirkiness that fits right into my home. Except, I am not going to put a picture of the original because hers is way better and you won't want to read my post anymore.

    The original creator of the "hello" bubble, used stretchy fabric for hers which would probably have been a way better idea because yarn took FOREVER. It was a nice little mindless task while listening to music so if you have an hour to kill, go for it.

    It's really cute because you can put it practically anywhere. I tried several different places until I was happy with where it settled.

    Nope, not here. It doesn't stand out enough against the paint color.
    Nada. The hello isn't even pointing at the deer. That's just silly. Plus we all know that deer don't say hello.
    Cacti can't say hello!
    Ah, here we go, I kind of like it here. It adds a nice center focal point to the mirror.
    I liked it in the center of the mirror because the mirror is just a little too classy as is; it needs a cheesiness factor much like everything else in my home! I can't get a good picture in its new home, so enjoy the fuzziness that is my masterpiece.  I'll probably move it tomorrow.


    Don't forget to read the tutorial on how to make this bad boy. And just remember; don't be like me, don't use yarn.


    Monday, May 26, 2014

    Desk Makeover and a Surprise!

    Oopsies on the countdown! I should've known better than to do a blogging extravaganza during the last week of school. I always forget how much there is to do until you are in the midst of it year after year. To celebrate being on summer break, I decided to do a little desk makeover that I have been wanting to do for a really really REALLY long time!


    This desk (we'll name her Penelope) has been in my family for years. My parents gave her to us to have in our home a little before we got married. I used this secretary's desk when I was younger to do my homework on and she has definitely been loved by our family.  Unfortunately, because she has been in so many moves, she has definitely seen better days. I don't know if you can see very well, but the legs are especially scuffed up.  Penelope had some serious nicks and scrapes and even thought I loved the beautiful stained wood, it was a little beyond repair.

    Here is the makeover...


    Ahhh - there we go, that's better.  I know I am not the first person on the planet to paint a piece of furniture, so it hardly seems blog worthy however I feel like it is such a transformation that I had to share. To be honest, this bad boy was quite a labor of love.

    We had to...

    1.  Sand it.
    2.  Sand it again.
    3. Wipe it down.
    4. Dang it, sand it again.
    5. Prime it - it turns into a gross pink because of the stain. George suggests we keep it that way... we move on quickly after that suggestion.
    6. Paint it.
    7. Paint it again.
    8. Paint it for a 3rd time.  Let it dry for a day.
    9. Put on the knobs and move it into its special place admiring your handiwork. What? The drawers don't open and close with ease anymore because of the paint? Eh, deal with that another day.

    I got the knobs from World Market and they make the desk fancy.


    The color is called Icy Mint in Valspar's Paint and Primer in One (semi-gloss) from Lowe's.


    The color makes me happy and totally transforms the room.


    In other news and slightly random - I'm on the cover of a magazine! Bet you didn't know you were reading a cover girl's blog post! It's kind of silly, but that doesn't mean I can't pretend to be a celebrity. So weird though, no one has offered to give me freebies - I even had to buy my own dang magazine! Haha!


    NBD.

    Saturday, May 10, 2014

    Mother's Day with a "Treat"


    Mother's Day is right around the corner (as in tomorrow, if you haven't thought about it you should probably hop to it).

    Treat Greetings is a company through Shutterfly that really is a showstopper when it comes to cards.  I was so impressed with the great quality of the paper that the cards are made from and the variety of the designs and styles to choose from.

    Even the shipping envelope is cute for crying out loud.


    They have so many options to change and personalize any card that you choose and that's what makes this company so creative and versatile. Not to mention that they also have super cute digital card options which I intend to use for my parent volunteer at the end of the year!


    I loved that you could add a little picture to the back of the card. I added a picture of my mother in law's "grand babies" aka our dogs.

    To go with this wonderful card, I decided to craft my mother in law some burlap banners. She just moved into a house and no one likes blank walls.  She saw this online and asked me to replicate it with some leftover burlap that she had.


    In order to take up more wall space I decided to make three separate "signs" rather than a banner.

    This was the final product.


    What you will need to make these are:

    • 1/4 inch copper pipes (3)
    • 1/4 inch copper pipe caps (6)
    • Jute twine (found at Walmart in the home improvement section) and colored yarn
    • Chalkboard spray paint
    • Heavy card stock
    • Tacky glue
    • Hot glue gun
    • Burlap
    First I used a shape to trace onto the heavy card stock and then cut them out. I just used some leftover card stock that I had in a color that I probably would never use again. Might as well recycle while gifting! :)

    Spray the paper with the chalkboard spray paint.  It took me a few coats to get even coverage.


    While that's drying, braid the twisted jute twine and the yarn together.  You don't have to add the colored yarn, but I thought it would be a nice pop of color since burlap is just so beige.


    My braids ended up being around 24 inches (2 feet) long each and that seemed to be good length with extra room to spare.  You may need to glue the caps on to the copper pipes because mine were pretty loose.

    Next step, cut a round rectangle out of another piece of card stock to use as a template to trace onto the burlap.  Make sure you make it a little taller than you would want normally so that you have an inch or so extra fabric to wrap around the copper pipes with the hot glue later.


    Once those are cut out you can start gluing them to the copper pipes.  This was kind of hard to photograph but just glue as you wrap the burlap around until it feels secure. I only wrapped it around once and it felt fine and sturdy. If you scroll through the next four pictures really fast it might feel like a moving picture show! :)


    Did you enjoy that??? ;)

    Tie on your braids into knots on to the ends of the copper pipes. I didn't glue my knots down because I liked the option to slide the knots wherever you would want them. Cut away the excess braid.

    Now you can glue on those spray painted card stock papers.


    Just use a thin layer of that tacky glue and it will be perfect.

    And voila! You have some beautiful hand crafted copper chalk board signs just begging to be hung up on your wall.


    Chihuahua photo bomb.

    Happy Mother's Day to all of the mothers out there! You all are incredible and I admire all of your hard work, patience, and unwavering love for your children! I hope you are given a day full of love and pampering that you so deserve. :)