Saturday, February 14, 2015

Walls Need Love Too

I love moving things around in my home and making them look new without actually going out to buy anything! Who doesn't love to shop their house?  I have been bugging George to make me these shelves for a really long time, but honestly I am not sure what I was thinking...

A.  We are not handy with power tools
B.  That would've been a whole lot of wood going on in a house that's already filled with wood         floors and wood cabinets 
C.  We are not wood workers and I enjoy having all 10 fingers

So I decided that these shelves would be a good alternative and they are pretty reasonably priced considering how much weight they hold.  Warning: You do have to screw about 36 holes in your wall so if you are squeamish about dry wall demolition, you may want to consider another route.

I love the new look and how bright and colorful it is now.


I filled them with some of my vintage treasures as well as some newer items that I have picked up and of course plants... because green always makes everything better. 


I tried to follow these guidelines when I planned out my shelves and what you are seeing is probably the 3rd or 4th version.  I stuck with blues, greens, oranges, and golds. That sounds like a wide range of colors, but I used orange citrus trees as my inspiration. Here in Phoenix, the bark of some citrus trees is painted white to protect it from sun burn.  The bark of citrus trees is very thin and if you don't use the paint, the tree could end up looking more like a bush because the tree will start growing leaves at the trunk to try to shade itself from the sun. Here's a less than stellar example...


So you can see on my shelves, I tried to replicate that same color palette.


I also added a few handmade touches - I added gold glitter to the antler and the felt wreath was made by TheFeltFlowerShop on Etsy. <3


Using different heights, colors, and textures makes this hodgepodge of items feel somewhat organized and put together.  I love it! It's hard to capture in pictures the full effect just because the shelves are so large, but hopefully you have gotten the overall idea.  If something is in your house that makes you smile when you look at it then it's a success, even if it's not perfect or everyone's cup of tea.  :) 


Thursday, February 12, 2015

Do the Dishes!

Even though it is just George and I living in our house, I am always so amazed at the amount of dishes that pile up! I created a quick little sign from a leftover chalkboard that we used in our wedding so that we could keep track of whose turn it was.  (ignore the water drop stains!)


I also added little Instax Mini pictures to the signs just to give it a little bit more of an ooomph and a punch!  Love my Instax Mini! If you don't have one you should buy one, but after you finish reading this post...


George's side towards me seems a little aggressive, but I created it so I must've been feeling guilty about my lack of doing dishes the day I made this!

Just a quick little craft! Have a wonderful 3 day weekend!


Sunday, February 1, 2015

Craigslist Coffee Table REDO

Is anybody else a Craigslist nut out there?

You know you are on Craigslist too often when you search for a category and you recognize things on repeat from your last virtual visit.  Some might call it a problem, I prefer to think of it as a talent.

One lovely lonely coffee table kept popping up every time I searched for midcentury tables.  George and I decided to venture out to the east side of town to see the table.  When we saw it I knew I wanted it immediately - it was substantial but not clunky looking.  It needed A LOT of tender loving care though; the Phoenix sun had not been kind to it and it was completely sun warped.

I paid the nice lady who made us eat the mystery citrus from her tree and went on our merry way home to our little condo, coffee table in tow.


The legs were almost white because the wood was so dry and sun bleached.  George went to work on sanding down the table and staining it.


Once we got our pretty couch delivered from West Elm (all hail West Elm!), we were able to move our finished coffee table into the living room.


I love how it looks, but the only issue was the woven rattan screens were still super sun bleached and didn't look so clean and nice looking.  See below and try not to shudder like I do every time I look at this incredibly up close. Zoom should be illegal...


I decided to paint the wooden weavings an antique gold color. I know, I know, before any one starts lecturing me about painting vintage furniture, I know I "shouldn't" paint it.  Simmer down - it's going to be okay, I promise.


It was super simple and took me about an hour to do one Sunday morning.  First I cleaned up the screens...

Then I taped off the table so that I wouldn't ruin George's handiwork.


 Finally, I painted away! It took me several coats, but they dried relatively quickly so it wasn't the most painful thing I have ever endured.


I love the final result!  It's definitely not super noticeable but it has given new life to this 1950's coffee table. It's not perfect, but it's charming and has a story about it and that's what I love.


Disclaimer: I know the photography skills on this post are not stellar. My beloved camera is on the fritz and getting fixed right now in California (at least someone is having a little vacation!).  My phone is getting a work out in the meantime, but I am definitely missing my little camera and the high quality pictures it takes. One day we shall reunite!

What do you guys think about the coffee table? Have you ever given a Craigslist piece of furniture  a new lease on life?

Sunday, January 18, 2015

Chairish Styleboard

I have a lot of wannabe personalities and aspirations...

Some days I want to be like the Pioneer Woman and live on a ranch with my family, homeschool my nonexistent children, and let George take care of the cows.  Does George know how to take care of cows? No. Does he have any desire to take care of anything bovine related? No.

Other days I want to live in a vintage refurbished trailer on the road with George living off the fat of the land.  Nothing but me (well and George, and the chihuahuas, well you get the point...) and the road - cruising my very own paved road of dreams. But then I remember that I need to make money some how and that you can't really live off the fat of the land if you are driving a gas hog all the time. 

Moving on to my point, another dream is that I wish I were talented enough to be an interior designer. However, I have no idea what I am doing and certainly don't even pretend to be as talented as say Emily Henderson (my decorating idol!), but I do enjoy it.  I am in the process of completing of a mini redo of my living room and am having so much fun with it.  

When Chairish contacted me about doing a styleboard based on a rug of my choosing, I was so excited to start and let my creative juices flow!  Chairish is an online company that makes it fun and easy for design lovers, like myself, to shop for vintage and used furniture.  I am a sucker for vintage goods and love the mix of new and vintage in a room.

Here is my style board...


The rug that I selected to focus my style board around was this beautiful Missoni octagonal rug.  I loved the jewel tones in it and decided to focus on picking up the green accents in the rug.   
All rugs at Chairish are available to view here.

This was so much fun to do!  Do any of you ever make style or mood boards for fun or before you start designing a room?  If you don't you should! 

Sunday, August 24, 2014

A Few Things - Back to School Version

It's Back to School time!!! Or if you live where I live, it's been Back to School time for a few weeks now, but better late than never, right?  I love a good theme so get ready!

Here are some of my favorite Back to School ideas that I have seen floating around.

These are too perfect. I wish I was more talented in the art of cake decor.

Gift wrapping idea for back to school (or Christmas, or birthdays, or Hanukkah, or Tuesdays...) Mine would not look this cute if I tried it, but I am going to pretend that it would.

Why don't they make this desk in my size???!!! This is from a children's store, The Land of Nod, and I LOVE it!! It even has a cup holder for my wine.


I love everything on here, but I think my favorite is the chalkboard cake. I didn't even know you could do that!!  I don't know how appealing it would be to eat a black cake, but who cares? It's too cute to eat anyway! Plus I am a little partial to this because I used those library cards in the #1 spot for my wedding.


The Teacher Wife is AMAZING!  I love these!!!

Those are just a few of the wonderful things that I have seen.  Happy back to school!

Thursday, August 7, 2014

Beginning of School Year Gift

Pinterest has the cutest ideas EVER for beginning of the school year gifts. Does anyone remember what they did before Pinterest?  I don't even try to think creatively anymore; I just automatically go on Pinterest now before I even activate my brain.

I wanted to make my new teachers a little gift to wish them good luck on their first day with their students!   I used this pin from Pinterest as my inspiration.


All you need to make this is the free printable (available at the bottom of the post), small snack sized ziplock baggies, a paper cutter or scissors, a stapler, and M&Ms. 

I used MEGA M&Ms which I had never seen before and those were a big hit because they are so huge! I have pretzel M&Ms pictured below however because I ran out and had to use my back up stash for the example. #bloggerproblems


Just cut out your printable after you add text to add your message on the back. Don't forget to rotate it  so that the message is readable and the right side up when you fold it!


Fold your message in half so that you have a tent and fill your baggie up with the candies. Slip the tented message over the top of the ziplock baggie, staple it in place, and then you are good to go. Super simple!


It took me about an hour to make over 20 of these baggies from start to finish (including designing the note!) so once you get your system down it goes pretty quickly!


I am having a few technical difficulties with this printable. I know you need to open it in Power Point so you can edit your own message on the other side of the note (see my example above).  If I give you a link to a PDF, you can add text to it, but not rotate it which is required when you do a ziplock bag topper like this.  Hopefully the font carries over when you open this Power Point template, but if it doesn't let me know via email or comment OR download the fun FREE font called Pacifico. :)
Click the picture below to download the potential tricky freebie.


I hope you are able to use this in your classroom and that the freebie actually works, haha!  Have a wonderful first day of school if you haven't started already and if you have I hope you had the best first day possible. :)


Monday, August 4, 2014

Monday Made It - Parking Lot Board

I'm baaaackkk! 

Wow you guys, this summer went by like a blur. Where did all of that time go that I was going to be super productive and create these creative crafts to post on this good ole blog?  


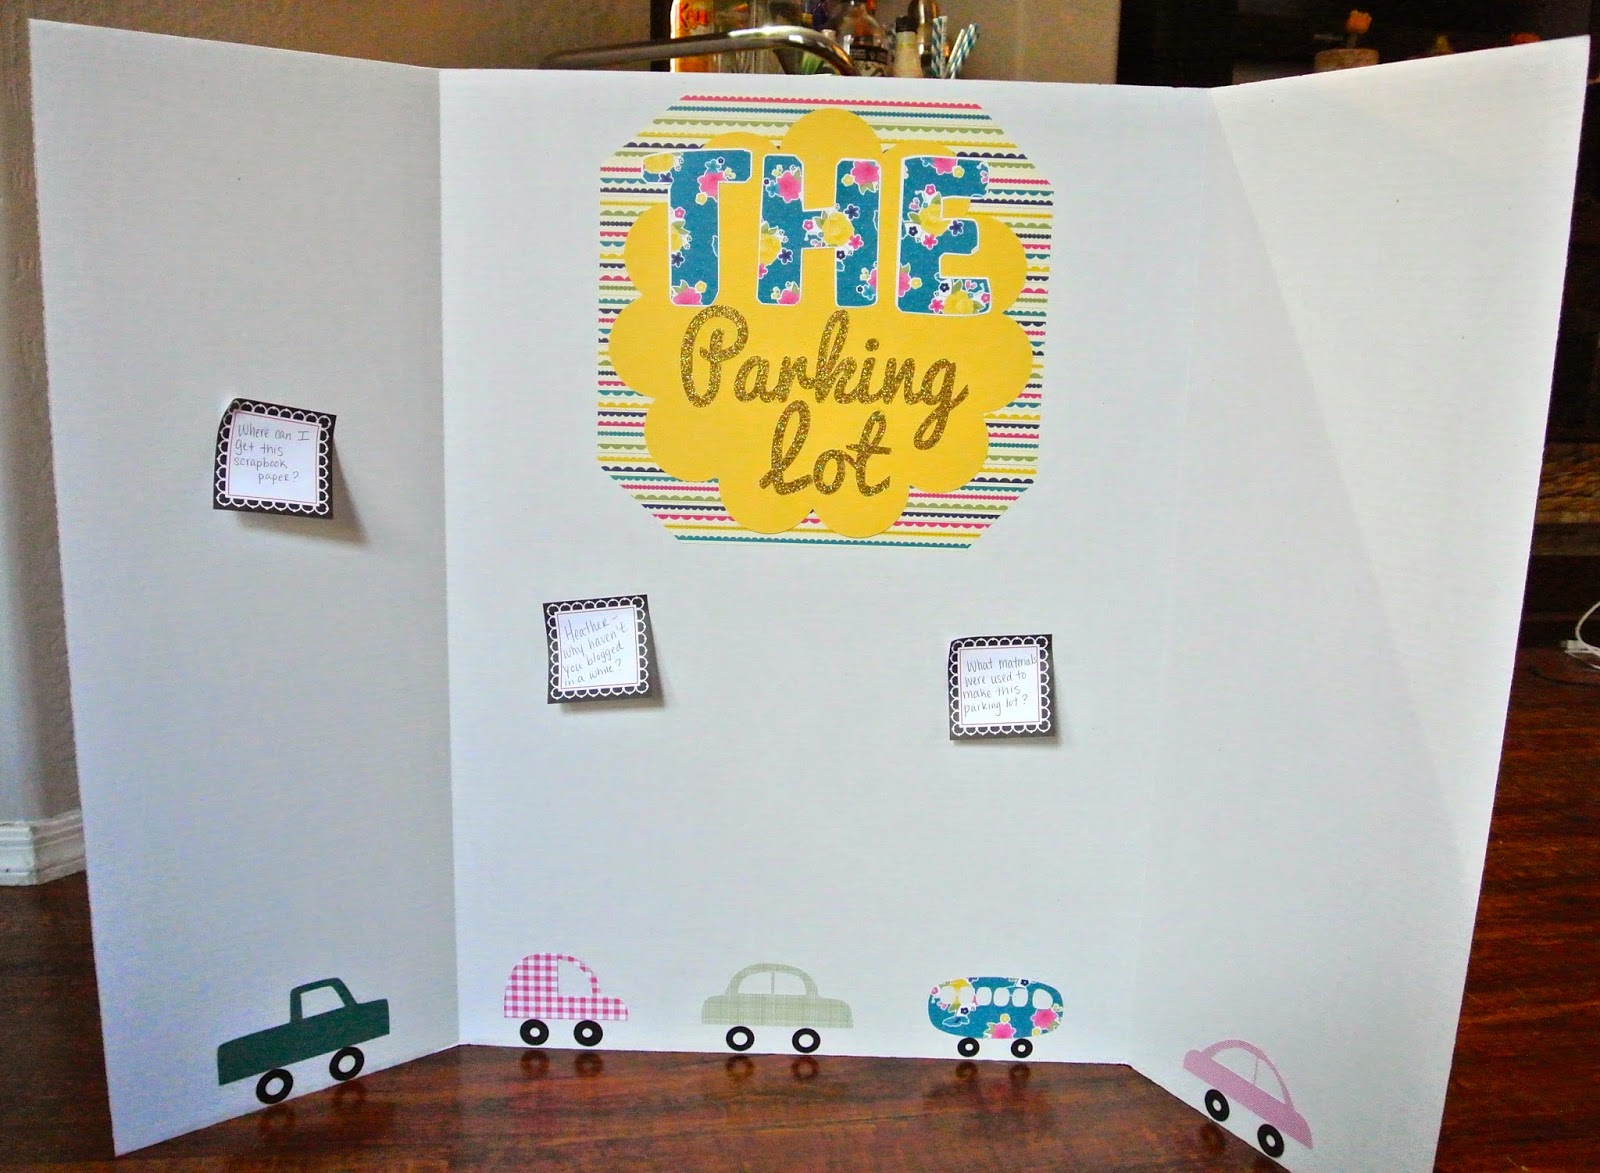
For Monday Made It, I made a Parking Lot board over the weekend for a training I am presenting today. This could be used in your classroom too as a formative assessment, a ticket out the door, or just for good old fashioned questions.  Do any of you use parking lots in your classroom?  I would love to hear your procedure for it if you do!


Let's address the questions on the board, shall we? Haha! 


Good question! 

  • Tri-fold board (Tarjay aka Target)
  • Scrapbook paper
  • Rubber Cement
  • Silhouette Cameo (car shape cutouts are from here)


  • I purchased this scrapbook paper from Stampin' Up. I don't see the designer series paper package that I used for this board but here is one that looks really cute and is similar.


    Well, there are a couple of reasons. I was on vacation for three weeks visiting my sister and her family as well as a road trip up to Nova Scotia, Canada! It was beautiful and I can't wait to post pictures on here soon as a memory for me and to show you all. 

    Another reason is that I started my new job as Instructional Coach last week and it has kept me really busy! I am still adjusting on being out of the classroom and hope that this blog will still be alive and kicking. 

    In the meantime, I hope you all can use the parking lot board idea in your classroom! 


    Be sure to link up to Tara's Monday Made It to post your creations!